[자료구조] 연결 리스트(Linked List)
연결 리스트(Linked List)
각 노드(항목)들이 다음 노드를 가리키는 형식의 자료구조,
배열과 달리 중간에 데이터(노드)를 삽입, 삭제하는 과정이 쉽다.
1. 연결 리스트의 구조
연결 리스트의 구조를 그림으로 포현하면 아래와 같다.
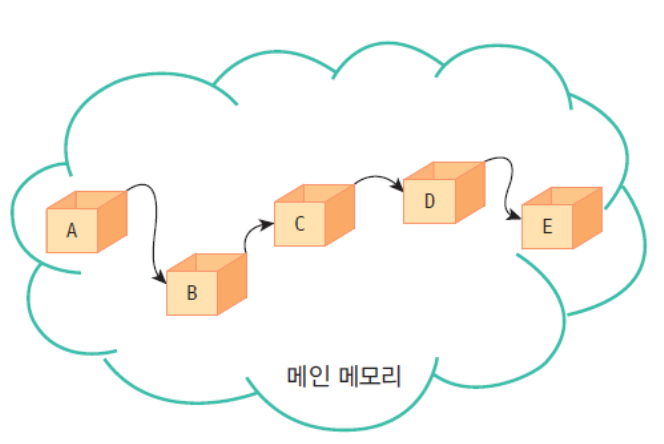
위 그림에서 알 수 있듯이 새로운 원소 F를 C, D 사이에 넣고 싶을 떄,
단순히 C의 다음 항목을 F 노드에 연결하고 F의 다음 항목을 D노드에 연결시키기만 하면 된다.
// 배열의 경우 삽입하고자 하는 부분의 뒤 모든 원소를 한 칸씩 뒤로 이동시켜야 하기에 훨씬 복잡하다.
2. 연결 리스트 구현
연결리스트를 C++ 코드를 사용하여
- 정적 메모리 할당 방식
- 동적 메모리 할당 방식
으로 각각 구현하면 아래와 같다.
ex1. 정적 메모리 할당 방식
#include <iostream>
using namespace std;

class Node{
private:
    int m;
    Node* link;
public:
    Node(int a = 0){
        m = a;
        link = nullptr;
    }
    void insertNext(Node* nextNode){ link = nextNode; }
    int getM(){ return m; }
    Node* getLink(){ return link; }
};

int main(){
    Node* head;
    Node n1(10);
    Node n2(9);
    Node n3(8);
    head = &n1;
    n1.insertNext(&n2);
    n2.insertNext(&n3);

    while( head != nullptr){
        cout << head->getM();
        if (head->getLink() != nullptr){ cout << "->"; }
        head = head->getLink();
    }
    cout << endl;

    return 0;
}
ex2. 동적 메모리 할당 방식
#include <iostream>
using namespace std;

class Node{
private:
    int m;
    Node* link;
public:
    Node(int a = 0){
        m = a;
        link = nullptr;
    }
    void insertNext(Node* nextNode){ link = nextNode; }
    int getM(){ return m; }
    Node* getLink(){ return link; }
};

int main(){
    Node* head;
    head = new Node(10);
    head->insertNext(new Node(9));
    head->getLink()->insertNext(new Node(8));

    while (head != nullptr){
        cout << head->getM();
        if (head->getLink() != nullptr){ cout << "->"; }
        head = head->getLink();
    }
    cout << endl;

    return 0;
}
2. output
ex1, ex2
10->9->8
3. 연결 리스트로 타 자료구조 구현
연결리스트를 이용하여 스택(Stack)과 큐(Queue)를 구현하여 보겠다.
연결 리스트를 이용한 스택 구현
class Node{
private:
    int data;
    Node* link;
public:
    Node(int d = 0){ data = d; }
    ~Node(){}
    void setData(int d){ data = d; }
    int getData(){ return data; }
    void setLink(Node* nextNode){ link = nextNode; }
    Node* getLink(){ return link; }
};

class LinkedStack{
private:
    Node* top;
public:
    LinkedStack(){ top = nullptr; }
    void push(Node* n){
        n->setLink(top);
        top = n;
    }
    Node* pop(){
        Node* tmp = top;
        top = top->getLink();
        return tmp;
    }
    void display(){
        Node* tmp = top;
        while(tmp != nullptr){
            cout << tmp->getData() << " ";
            tmp = tmp->getLink();
        }
        cout << endl;
    }
};

int main(){
    LinkedStack ls;
    ls.push(new Node(10));
    ls.push(new Node(20));
    ls.push(new Node(30));
    ls.push(new Node(40));

    ls.display();

    cout << ls.pop()->getData() << endl;
    cout << ls.pop()->getData() << endl;

    ls.display();
}
연결 리스트를 이용한 큐 구현
class Node{
private:
    int data;
    Node* link;
public:
    Node(int d = 0){ data = d; }
    ~Node(){}
    void setData(int d){ data = d; }
    int getData(){ return data; }
    void setLink(Node* nextNode){ link = nextNode; }
    Node* getLink(){ return link; }
};

class LinkedQueue{
private:
    Node* front;
    Node* rear;
public:
    LinkedQueue(){ front = rear = nullptr; }
    void enqueue(Node* n){
        if (front == nullptr && rear == nullptr){
            front = n;
            rear = n;
        }else{
            rear->setLink(n);
            rear = n;
        }
    }
    Node* dequeue(){
        Node* tmp = front;
        front = front->getLink();
        return tmp;
    }
    void display(){
        Node* tmp = front;
        while(tmp != nullptr){
            cout << tmp->getData() << " ";
            tmp = tmp->getLink();
        }
        cout << endl;
    }
};

int main(){
    LinkedQueue lq;
    lq.enqueue(new Node(10));
    lq.enqueue(new Node(20));
    lq.enqueue(new Node(30));
    lq.enqueue(new Node(40));

    lq.display();

    cout << lq.dequeue()->getData() << endl;
    cout << lq.dequeue()->getData() << endl;

    lq.display();

    lq.enqueue(new Node(50));
    lq.display();
}
4. output
스택
40 30 20 10
40
30
20 10
큐
10 20 30 40
10
20
30 40
30 40 50
정리,
연결 리스트(Linked List)는 배열에서의 단점을 보완할 수 있는 자료구조이다.
- (데이터 삽입, 삭제 / 동적으로 메모리 공간 활용 가능)
단점 역시 존재한다. (구현이 어렵고 오류나기 쉬움, 중간 데이터를 빠르게 가져올 수 없음)